Seamless integration with PayPal allows you to collect payments, subscriptions and donations as a part of your campaign. Simply connect your PayPal account and Woorise takes care of all payment activities in an automated and secure manner.
PayPal Checkout allows you to quickly and easily accept payments from 286 million PayPal customers, in over 100 currencies and across 200 markets, with advanced Fraud Protection and unprecedented control.
Your PayPal account country must be listed as supported for PPCP, Before in the following PayPal’s documentation page. If PayPal doesn’t support PPCP, Before for your account, you can’t use this integration.
In this article
PayPal Settings
The PayPal Settings will allow you to connect and authenticate with your PayPal account.

- Activate PayPal Integration and click on Settings.
- Under PayPal Settings, select the Environment to use for PayPal integration: Live or Sandbox. Live is for real transactions, and Sandbox is for testing the integration and submitting test forms.
- Click the Connect with PayPal button.
- In the PayPal modal which is displayed follow the steps provided by PayPal to connect to an existing PayPal account or create a new PayPal account.
- When you have completed connecting the add-on to your PayPal account click the go back button to close the modal. The settings page will reload.
- When the PayPal is successfully connected the Connect with PayPal button will be replaced with your PayPal merchant ID and the Disconnect from PayPal button.
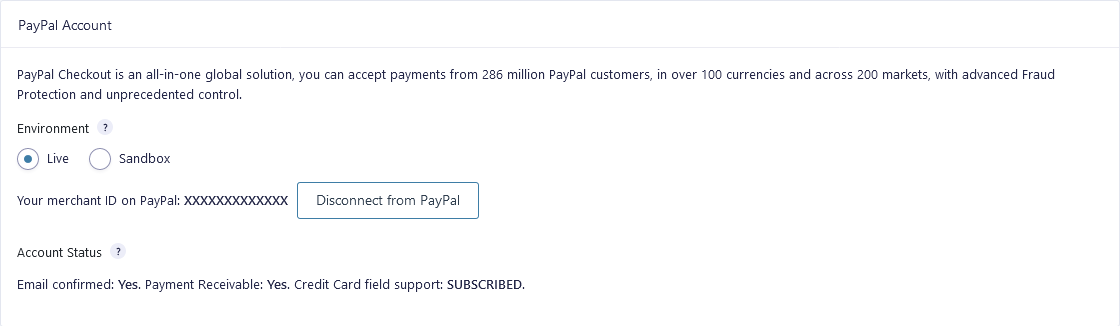
Account Status
This is only displayed when the integration is connected to PayPal, it displays the current status of the PayPal account used to connect to the PayPal Checkout.
- Email confirmed
Indicates whether the primary email of the connected PayPal account has been confirmed. PayPal requires your account email address is confirmed before you can accept payments. See the How do I confirm my email address? article on the PayPal Help Center site. - Payment Receivable
Indicates whether the connected PayPal account can receive payments. There are many reasons why PayPal can indicate your account can’t receive payments. Please contact PayPal for support with this issue. - Credit Card field support
Indicates whether the connected PayPal account supports accepting payments using the credit card payment method of the PayPal Field. This feature is available to selected countries.
At the time of writing, it is available for the following countries: Belgium, Bulgaria, Cyprus, Czech Republic, Denmark, Estonia, Finland, France, Greece, Hungary, Italy, Latvia, Liechtenstein, Lithuania, Luxembourg, Malta, Netherlands, Norway, Poland, Portugal, Romania, Slovakia, Slovenia, Spain, Sweden, UK, and US.
PayPal also need to review your account to enable the feature. Check with PayPal for the most up-to-date information on requirements and available markets.
If this feature is not enabled for your PayPal account you can still capture payments using PayPal Checkout which is also available with the PayPal Field.
Create a PayPal Feed
Before the PayPal can be used with Woorise you will first need to create a feed. The feed configuration determines what type of transaction should occur when the form is submitted, what to use as the payment amount, and which fields contain values that should be passed to PayPal.
If you have have added a PayPal Field to your form, you should find that a feed has already been created and configured automatically for you in the Form Settings > PayPal Checkout area. You’ll want to view this feed to ensure the Billing Information fields are mapped to the correct form fields.
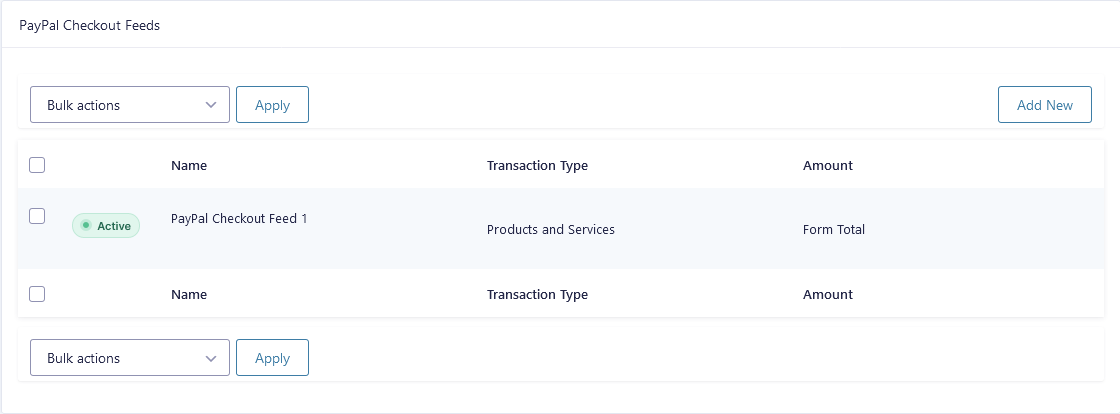
- Click on Campaigns and edit the campaign you want to be used with PayPal.
- Next, click the Form tab.
- From this page, hover over Form Settings on the top menu, and click on PayPal.
- Click Add New to create a new feed or click the Edit action link which appears when you hover over an existing feed in the table. You will then be presented with the PayPal Checkout feed settings screen.
You can create multiple PayPal Checkout feeds for your form; however, you must configure conditional logic on them. The PayPal Checkout will only process one feed during submission; if conditional logic is not configured, it will use the first feed it finds.
PayPal Feed Settings
The following fields are available within the PayPal feed settings screen.
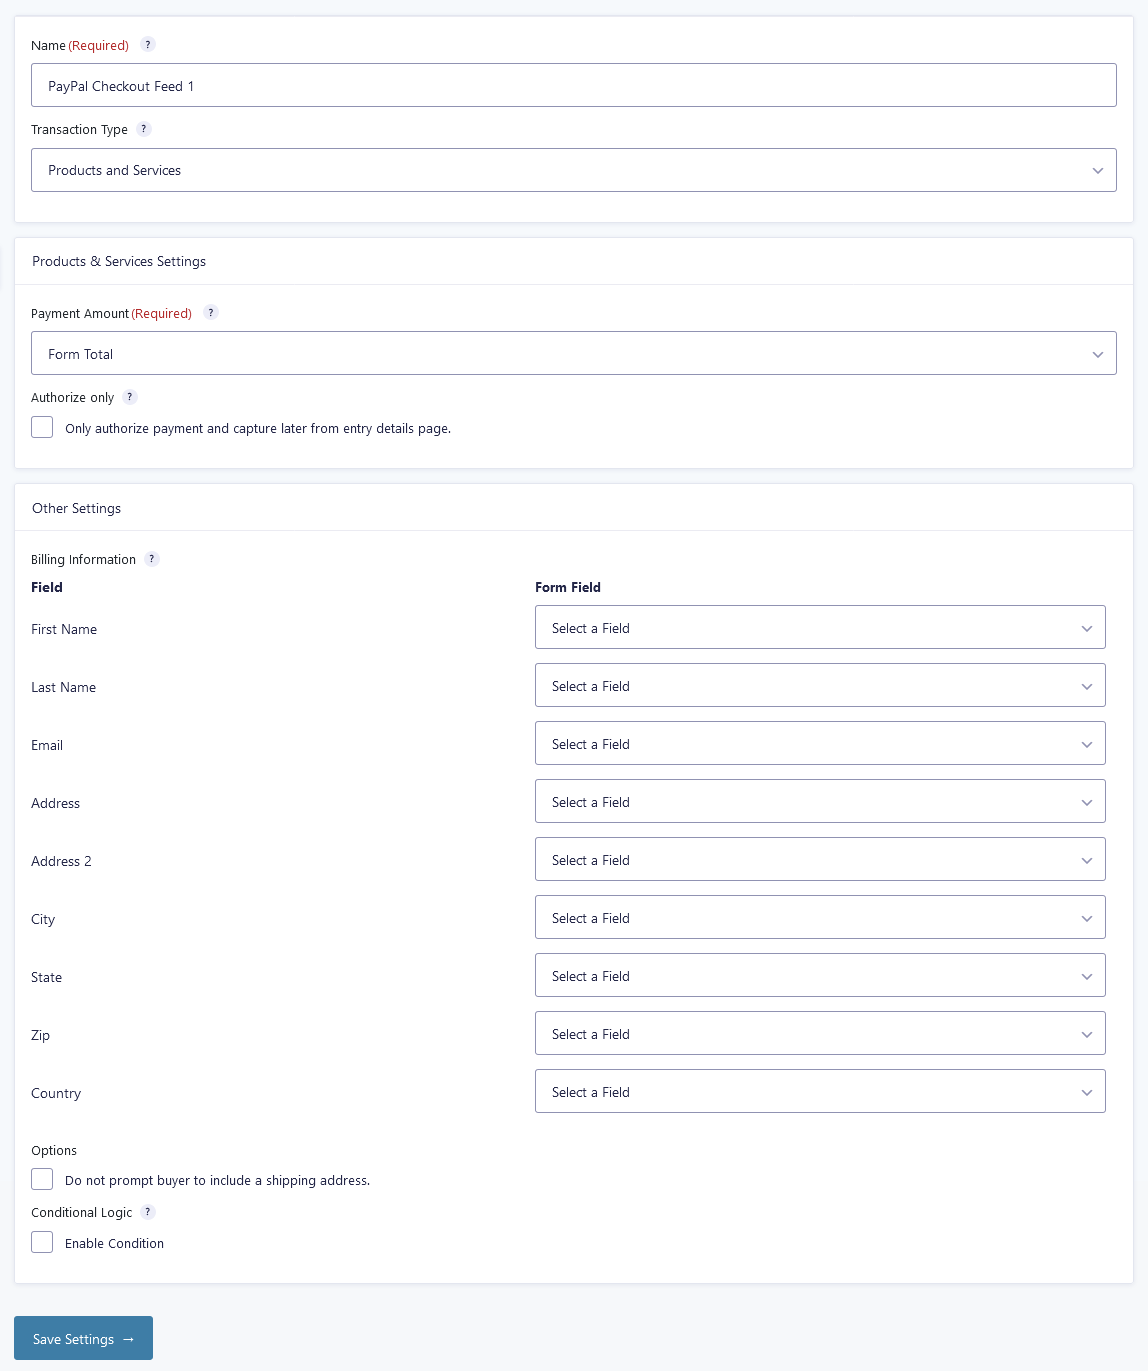
- Name
A feed Name is required. It is only used for identification and will not be shown anywhere other than your feed listing. - Transaction Type
Select the Transaction Type. This drop down contains the transaction types which the add-on supports. Products and Services or Subscriptions (recurring payments).
After you have selected your desired option within the Transaction Type dropdown, you will see various other fields appear that are specific to the option you have selected, in addition to other options below it.
Products & Services Settings
- Payment Amount
The Payment Amount field denotes which field will be used for the payment amount. It can be set to Form Total or an additional field that you have configured.
Other Settings
- Billing Information
Configures what billing information is sent to PayPal when processing a transaction. Map each of the billing fields to the desired form field that will contain that information. - Options
If you do not need PayPal to capture a shipping address, enable the checkbox labeled Do not prompt buyer to include a shipping address. - Conditional Logic
If unchecked, every successful form submission will be sent to PayPal. If you want payment to be conditional based on how the user completes the form, check the “Enable Condition” box and fill out the rules which must be met.
Subscription Settings
- Recurring Amount
The Recurring Amount setting allows you to set the amount that the subscription will bill for. Using the drop down, you can set the recurring payment amount as one of your product fields or the form total. - Subscription Product Type
Indicate the type of product that this subscription is for, either Digital, Physical or Service - Billing Cycle
The billing cycle determines how often the recurring payment should occur. You can choose a numeric interval of days, weeks, months or years. - Recurring Retry
Select this option to retry the charge again after a failed attempt. - Recurring Times
Select how many times the recurring payment should be made. The default is to bill the customer until the subscription is canceled. - Setup Fee
You can either enable a Setup Fee or a Trial Fee. Click Enabled to enable and you can choose a product field from your form to be used as the setup fee. - Trial
Use the Trial to establish a trial period for your subscription. You can either enable a Setup Fee or a Trial Fee. Click Enabled to enable the Trial Fee and you’ll be given additional options to complete.
Trial Price: You can select either a Free Trial, enter an amount for the trial price or choose from the product field from your form as the trial price.
Trial Period: This is the duration for the trial subscription until the regular price is charged. You can choose a numeric interval of days, weeks, months or years.
Entry Details
The entry detail screen will show Subscription Details box including status, start date, subscription ID, and recurring amount.
Notifications
You can set up email notifications for the subscription related events of:
- Subscription payment completion
- Subscription payment failure
- Subscription cancellation
- Subscription expiration